


Typing is the slow part of a lot of Mac work: the Slack reply you keep rewording, the email you’ve been putting off, the notes after a call. Your Mac can take all of that by voice. There are two ways to do it:
- Apple Dictation — free, built into macOS, and good at turning speech into words.
- An AI dictation app like Wisper — you hold a key, talk, and get clean, punctuated text with the “um”s and false starts already gone.
This guide covers both, step by step, plus the spoken commands, the limits nobody mentions and what to do when dictation stops working.
Quick answer: open System Settings → Keyboard, scroll to Dictation and turn it on. Click into any text field, press the Microphone key (or your Dictation shortcut, or Edit → Start Dictation), and talk. Press Esc to stop.
Option 1: Apple Dictation (free, built in)
Turn it on
- Choose Apple menu → System Settings, then click Keyboard.
- Go to Dictation and turn it on. If macOS asks, click Enable.
- While you’re there, check two settings: the language, and the shortcut. The shortcut menu offers several options, such as pressing the Fn key twice. Pick one you won’t hit by accident.
The first time you turn it on, macOS also asks whether to share audio recordings with Apple to improve Siri and Dictation. Apple says it “may review a sample of stored audio”. You can choose Not Now and change your mind later in Privacy & Security.
Start and stop
Click where you want the text to go, then start Dictation any of these ways:
- Press the Microphone key in the top row, if your keyboard has one.
- Use the Dictation shortcut you chose.
- Choose Edit → Start Dictation from the menu bar.
A microphone icon appears next to the cursor. Talk normally. To stop, press Esc, the Microphone key or the shortcut again.
Two details from Apple’s guide that most tutorials skip: you can dictate text of any length without a timeout, but Dictation stops by itself after 30 seconds without speech. And on a Mac with Apple silicon, you can keep typing while Dictation is on — no need to stop it to fix a word.
Say punctuation and formatting
In supported languages, macOS adds commas, periods and question marks for you as you talk. For everything else, say the command. These are the ones worth memorizing:
| Say | You get |
|---|---|
| “new line” / “new paragraph” | A line break / a blank line |
| “comma”, “period”, “question mark” | , . ? (when auto-punctuation misses) |
| “colon”, “dash”, “open parenthesis” | : – ( |
| “caps on” … “caps off” | Title Case for the words in between |
| “all caps” + word | THE NEXT WORD in capitals |
| “no space on” … “no space off” | Words joined without spaces |
| “numeral” + number | The digit instead of the word |
| “heart emoji” | ❤️ (say the emoji’s name) |
Apple’s full list also covers currency, math symbols, quotes and brackets. It’s linked in the sources at the end.
Fix mistakes as you go
When Dictation isn’t sure about a word, it underlines it in blue. Click the underlined text to see alternatives and pick the right one. For anything else, edit with the keyboard as usual — that’s usually faster than trying to correct by voice.
The limits worth knowing
- Raw words, not finished text. Apple Dictation writes what you said. If you said “um, so, can we move the call to three — no, Friday”, that’s roughly what you get.
- Languages vary. Apple says Dictation isn’t available in all languages or regions, and features vary by language. You can switch language while dictating by clicking the language next to the cursor.
- Voice Control takes over. If you turn on Voice Control (an accessibility feature), you dictate through Voice Control and standard Dictation isn’t available.
- On device, mostly. Keyboard settings tell you when your requests are processed on your Mac and not sent to Apple’s servers.
For quick replies, searches and short notes, that’s often all you need. It starts to hurt when you dictate longer messages and spend the saved time cleaning them up.
Option 2: AI dictation with a hotkey (Wisper)
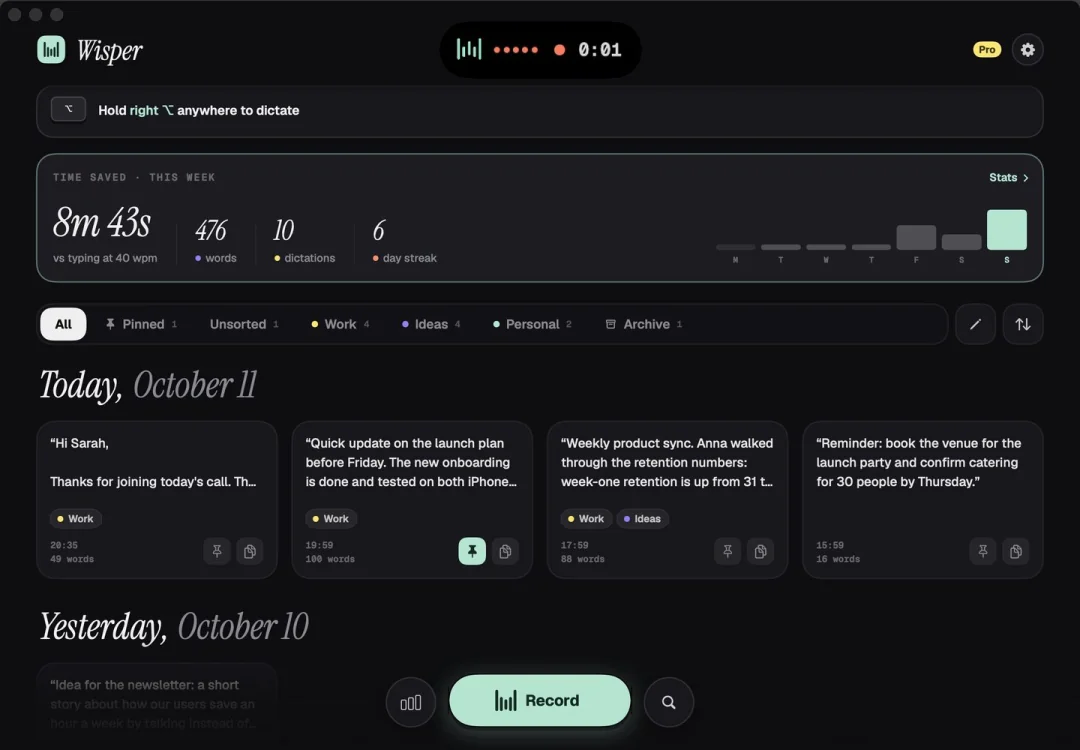
AI dictation apps keep the same idea — talk instead of type — but run what you said through a language model before it lands. With Wisper for Mac, fillers come out, spoken corrections are applied (“three — no, Friday” becomes “Friday”), punctuation goes in and lists get formatted. The Default style keeps your words; it doesn’t rewrite you.
Set it up: two permissions
- Install Wisper from the Mac App Store. It runs on macOS 14 Sonoma or later.
- Allow the microphone when macOS asks, the first time you dictate.
- Turn on Accessibility. Wisper opens System Settings → Privacy & Security → Accessibility for you; switch Wisper on. That’s what lets it paste where your cursor is. Without it, Wisper copies the text and you press ⌘V.
Dictate: hold, talk, let go
Click into any app — Slack, Gmail, Notion, Cursor, a browser field — then:
- Hold right ⌥ Option. A small pill appears at the top of the screen with a waveform that follows your voice.
- Talk the way you would to a colleague. Pauses, restarts and “ums” are fine.
- Let go. Wisper pastes clean text where your cursor is.
You can also use Fn or ⌥W as the hotkey. If you pick Fn, change Apple’s Dictation shortcut so the two don’t fight over the same key.
For longer thoughts, double-tap the hotkey to go hands-free, talk as long as you need, and tap to stop.
Change the tone while you talk
Press 1–9 while you’re talking to switch style mid-sentence. The same thought can come out as an email, a Slack message, a code comment or a prompt — you choose before you let go.
Edit text you already wrote
Select any text, hold right ⌥ and say what to change: “shorter”, “friendlier”, “in Spanish”. Wisper rewrites it in place, and ⌘Z undoes it like any other edit. There are also one-key transforms: ⌥1 Polish, ⌥2 Formal, ⌥3 Casual, ⌥4 Translate and ⌥5 Bullets.
Wisper is free to start with a daily allowance of dictations. Pro is $49.99 a year ($4.17/month billed yearly) with a 3-day free trial, and one subscription covers your Mac and iPhone. One honest limit: on Mac, Wisper needs an internet connection.
Apple Dictation vs AI dictation: when to use which
| Apple Dictation | Wisper | |
|---|---|---|
| Price | Free, built in | Free daily dictations; Pro $49.99/year |
| Start | Mic key, shortcut or Edit menu | Hold right ⌥ (or Fn, ⌥W) |
| What you get | Your words, punctuated | Clean text: fillers out, corrections applied, lists formatted |
| Tone and styles | — | Styles on keys 1–9 while you talk |
| Edit by voice | Pick alternatives for underlined words | Select text, say the change |
| Offline | Often on device | Needs a connection |
| Translate as you speak | — | Into 30 languages (Pro) |
Use Apple Dictation for searches, short replies and anything you need offline. Use AI dictation when the text matters — emails, long messages, docs, prompts — and you don’t want to spend the time you saved fixing it. Plenty of people keep both: Apple’s for quick bits, a hotkey app for real writing. There’s a longer side-by-side in Wisper vs Apple Dictation.
How to dictate well (whichever tool you use)
- Say the whole thought, then stop. Dictation works best in complete sentences. Don’t pause mid-sentence to watch the words appear.
- Don’t fix as you go. Finish the paragraph first. Correcting word by word kills the speed advantage.
- Use a decent mic in noisy rooms. Apple recommends a headset microphone if you’re somewhere noisy or echoey.
- Teach it your words. Names and jargon are where dictation trips. In Wisper, add them to the Dictionary once; for text you repeat — your email, a link, a sign-off — save a Snippet and just say “my email”.
- Read before you send. Every dictation tool mishears sometimes. A five-second scan is still far faster than typing.
When dictation doesn’t work
Apple’s own checklist covers most problems:
- Make sure Dictation is turned on in Keyboard settings, and that you’re using the right shortcut.
- Check the language and region.
- Pick the right microphone source in Keyboard → Dictation. With “Automatic”, your Mac chooses the device it thinks you’re most likely to use — which isn’t always the one you’re talking into.
- If you use an external mic, check its input volume, and make sure nothing (clothes, a hand, your laptop lid) is covering the mic.
- Reduce background noise, or use a headset.
- You may need an internet connection.
If Wisper records but nothing appears in your app, check that Wisper is switched on under System Settings → Privacy & Security → Accessibility. If it’s off, your text is still on the clipboard — press ⌘V.
That’s it: turn on Apple Dictation today for the quick stuff, and if you write a lot, try a hotkey app on your real messages for a week. You’ll know within a day whether you want to go back to typing.
Questions
Is there a time limit on Mac dictation?
Apple says you can dictate text of any length without a timeout, but Dictation stops automatically when no speech is detected for 30 seconds.
What is the keyboard shortcut for dictation on a Mac?
Press the Microphone key in the top row if your Mac has one, or the Dictation shortcut you pick in System Settings → Keyboard → Dictation (one option is pressing Fn twice). You can also choose Edit → Start Dictation in most apps.
Does Mac dictation work offline?
Often, yes. Keyboard settings tell you when general dictation is processed on your Mac and not sent to Apple. Apple’s troubleshooting page also notes that you may need an internet connection. Wisper for Mac needs a connection.
Can I dictate into any app on a Mac?
Yes. Apple Dictation works in most places you can type. Wisper works anywhere there’s a cursor — Slack, Gmail, Notion, Cursor — and pastes the text when you let go of the key.
Why does Wisper need Accessibility on a Mac?
To paste text into the app you’re using and to read your selection when you edit by voice. Without it, Wisper copies the text and you press ⌘V.
Sources
- Apple Support — Dictate messages and documents on Mac
- Apple Support — Commands for dictating text on Mac
- Apple Support — If Dictation on Mac doesn’t work as expected
- Apple — macOS feature availability (Dictation languages)
Third-party facts last checked Oct 2026, from each company’s own site or the cited source. Wisper facts are from our pricing page and platform pages. Something out of date? Tell us.